Lighting
Mixing practicals with cinema lights
Making in-frame lamps, windows, and sconces work in concert with your fixtures
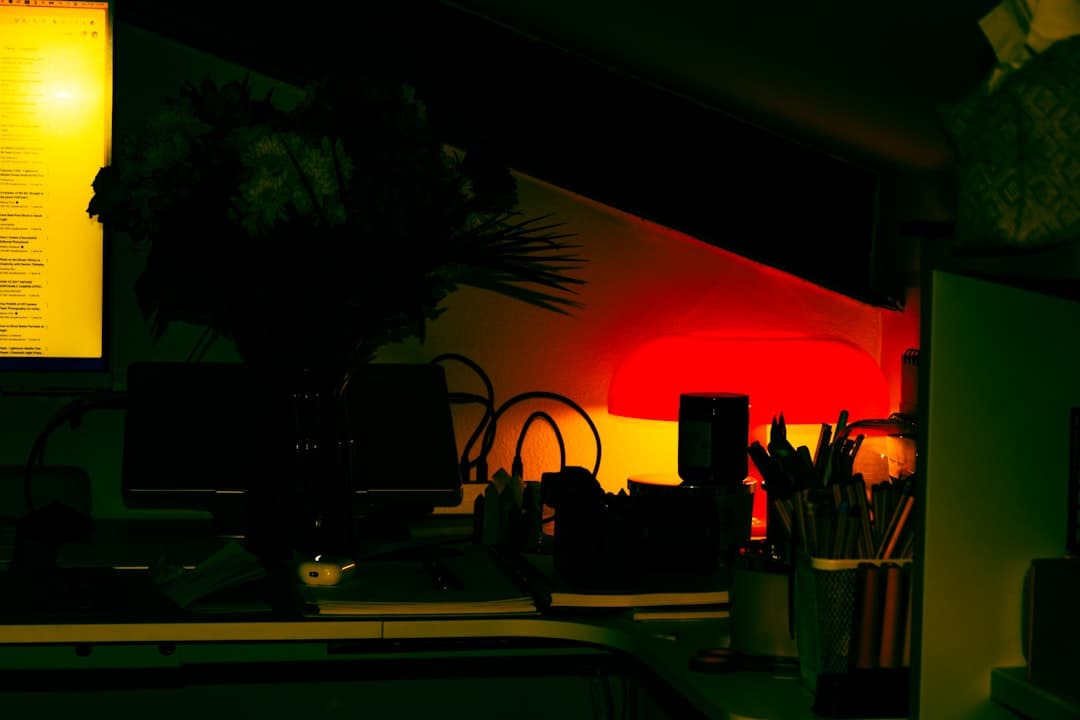
Photo by okeykat on Unsplash
What "practicals" mean
A practical is a light source visible in the frame: a table lamp, a wall sconce, a window with daylight pouring through, a neon sign, a candle, a phone screen lighting up a face. They're called practicals because they appear to be the "practical" reason the scene is lit — the audience sees the lamp and accepts that the lamp is what's lighting the room.
In reality, a working lamp at 60W is not going to expose a digital cinema sensor at f/2.8. The lamp is for the audience's eye; the cinema fixtures off-frame are doing the actual lighting work. The skill is making the two read as one.
Why practicals make scenes feel real
Watch any film noir, any prestige TV interior, any well-shot drama set at night. There's almost always a visible source: a desk lamp, a window with the curtain glowing, an open doorway with light spilling from another room. That visible source motivates the lighting — it gives the audience's brain a reason for the way light falls on the subject.
Without a visible source, the lighting feels suspended. Where is the light coming from? Why is her face lit from screen-left? Without a lamp or window justifying it, the audience's brain registers "lit set" rather than "lit world."
Adding a visible practical, even a dim one, transforms how the rest of your lighting reads. This is one of the cheapest, most effective interventions a DP can make.
Categories of practicals
Lamps (table lamps, floor lamps, desk lamps). The most common. Place them in frame, light through them, and have your cinema fixtures fill in the parts they don't reach.
Wall fixtures (sconces, mounted lights). Common in hallways, restaurants, hotel rooms. Often dimmable.
Windows (with or without curtains). The biggest practical of all. A window letting light into a room is the most powerful "natural" justification you can have.
Practical screens (TVs, computers, phones, tablets). The flickering glow of a TV across a face is a whole sub-category of cinematic lighting.
Fire / candles. Notoriously hard to light by — too dim, too inconsistent. The cinematographers who do this (Barry Lyndon, The Northman) usually use special high-ISO sensors or fast lenses plus hidden fill, even with candles in frame.
Neon / commercial signs. Bars, motels, urban exteriors. Colored, low intensity, often the only source you'd actually accept on screen.
Vehicle headlights, dashboards. Driving scenes have their own grammar (often a "process trailer" tows the car so you can light it from outside).
The LED-swap trick
You'll almost never use the bulb that came in the lamp. Production-quality lighting depends on swapping the bulb for an LED you can control.
Why:
- Stock bulbs are usually too dim to register meaningfully in frame
- Color temperature varies wildly between household bulbs (2,700K vs. 4,000K vs. "soft white" — actually all different)
- You need a dimmable bulb so you can adjust intensity to match the rest of your lighting
- Some scenes need the practical to change color or intensity mid-take (a "sunset out the window" effect)
Modern productions use smart LED bulbs like Astera NYX, Aputure B7c, or Hue/LIFX (the consumer smart bulbs work in a pinch). The bulb is set via a phone app or DMX controller. You dial intensity, color, and even flicker patterns from the monitor cart without touching the fixture.
Replace the bulb, set its color to match your scene's intended temperature, and dim it to where it reads as "the lamp is on" without overwhelming the frame.
Balancing practicals with cinema fixtures
The art is matching:
Color temperature. Your practical and your cinema fixtures should agree. A 2,700K LED bulb in a lamp matched by a 2,700K-set Aputure 600x across the room reads as one warm environment. Mismatched, the two sources fight each other.
Direction. A lamp on a side table justifies light coming from the right of the subject. Position your hidden cinema fixture to support that direction — also from the right, at the same height-ish, so the actor's shadows agree with the lamp's apparent direction. If the lamp is to the right but the cinema light is to the left, the audience's eye catches the mismatch even if they can't articulate why.
Intensity ratio. The practical should look like it's "doing work." If your lamp at full brightness barely registers but the cinema fixture is blasting, the audience sees that the lamp is decorative. Dim the cinema fixture, brighten the lamp, or both — until the ratio between the visible source and the rest of the light feels believable.
Falloff. Practicals have natural light falloff — a small lamp lights a small area. If your cinema fixture has zero falloff (a huge softbox lighting the whole wall evenly), the practical looks fake. Use light shaping tools (a flag, a snoot, a Fresnel pulled tight) to give your cinema fixture realistic falloff that matches what the practical would do.
Common scenarios
Interior night, single lamp on a desk. Replace the lamp bulb with a dimmable LED at ~2,800K. Add a cinema fixture (a soft 1×1 LED panel, say) just off frame on the same side as the lamp, also at 2,800K, dialed to provide the actual exposure. The audience reads "the desk lamp is what's lighting him." The fixture does the real work.
Daytime interior, window light. A 4×4 silk just outside the window (with a cinema HMI or large LED behind it) gives you controllable "sunlight" pouring in. Inside, a bounce card just out of frame catches the window light and adds fill to the shadow side. The window is the practical; the bounce is the off-frame supplement.
Hallway, single sconce. Replace sconce bulb with smart LED. Position a small cinema fixture out-of-frame from the same side as the sconce. Dial the relationship.
Driving scene, dashboard glow. This is one place where the practical alone is the lighting. The faint blue-green dash glow on faces, combined with passing streetlights and occasional headlight wash, is the actual look. Cinema fixtures supplement only if the scene needs more — and even then, they're tuned to match the dash color.
TV-lit scene. Set the TV to a content that emits a consistent flicker (a specific recorded loop, or a special "lighting plate" from a generator). Position your camera so the actor's face catches the TV glow. Often a hidden cinema fixture supplies the actual baseline exposure, and the TV adds the flicker on top.
When to skip practicals
Not every scene needs them. Sometimes the story is in starkness (a horror scene with no source justification), abstract spaces, dance pieces. The "no visible source" look is a deliberate choice, just like the "always have a source" look is a deliberate choice. The key is making it intentional.
Common mistakes
- Leaving the stock bulb in. Almost always too dim, wrong color, not dimmable. Swap it.
- Practical too bright. A lamp that's brighter than the actor's face reads as a fake key light. Dim the lamp until it looks "decorative-bright" but the actor's face holds your eye.
- Direction mismatch. Lamp on the right, cinema light on the left = visible disconnect.
- Wrong color temperature. A 2,700K lamp under 5,600K daylight from a window without explicit balancing reads as broken light. Match or contrast intentionally (a warm lamp against cool exterior is a beloved look — but you have to commit to it).
- Window blowing out. Most cinema sensors can't hold a sunlit exterior and a properly exposed interior at the same time. Either flag the window, gel it down, or accept that the window will overexpose — sometimes that's the look.
- Forgetting the falloff. A small lamp shouldn't light the whole room. Build falloff into your cinema fixture too.
What to practice this week
Find a room with one practical light — a table lamp, a desk lamp, anything. Sit a friend in the room.
Shoot the scene three ways:
- Practical only — just the lamp on, no other lights. Your subject will probably be too dark.
- Practical + on-camera fill — lamp on plus a small bounce or LED panel from behind the camera. Your subject is exposed but the scene feels flat.
- Practical + motivated cinema fixture — lamp on plus a cinema fixture (or even a friend holding a phone) coming from the same side as the lamp, matched in color. Subject is exposed and the lighting feels organic.
You'll feel the difference. Approach number three is what working DPs do constantly — practicals do storytelling work, hidden fixtures do exposure work.
More lessons
Browse all
Audio
Audio fundamentals for video
Why bad audio kills good footage — and how to capture clean sound on a small crew
Audio
Multi-track audio workflow for narrative
Capturing lavs, boom, ambience, and timecode reference cleanly on a multi-input recorder
Business & freelance
Showcasing your work online
A reel that gets calls back, a portfolio site that works, and the basics of being findable
Found this useful?
Bookmark BOLD University and share it with someone learning the craft. New lessons go up regularly.
Back to University