Lighting
Negative fill and shaping shadows
Why subtracting light is often more powerful than adding it
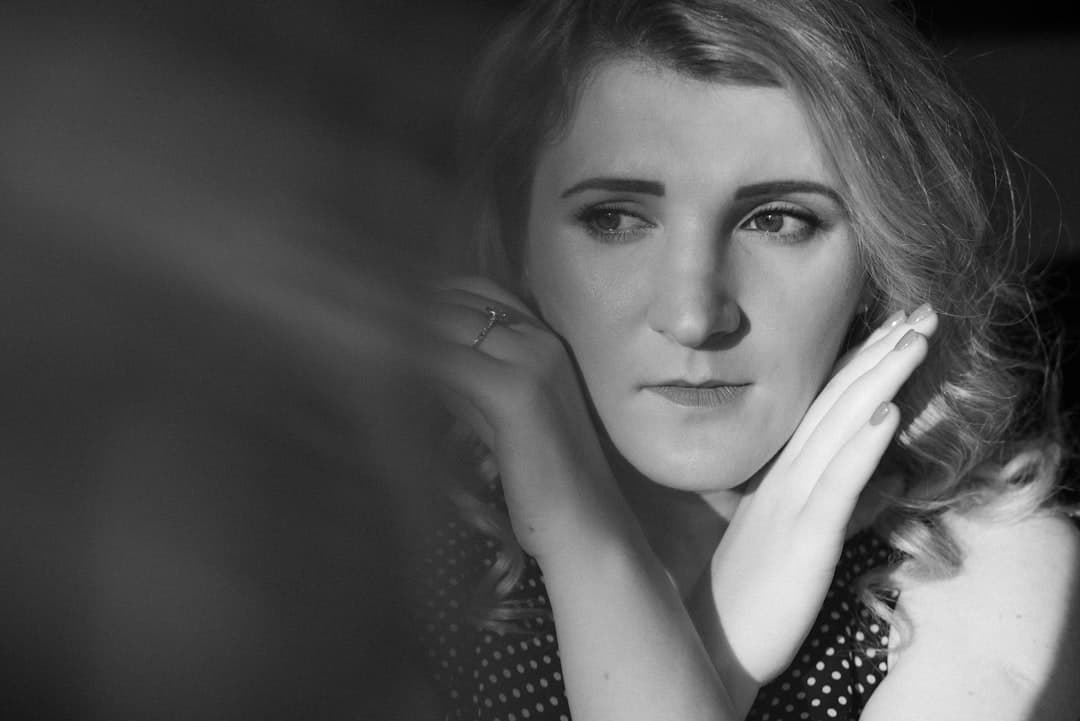
Photo by Ilona Panych on Unsplash
The principle of subtraction
When a newcomer lights a scene, the instinct is to add light wherever there's shadow. Brighter is brighter. More is more. Get rid of those dark spots.
Working DPs go the opposite direction. They look at a scene and ask: where can I take light away?
A face lit from a key and softly filled with bounce or a fill light tends to look pleasant but flat. The same face with negative fill opposite the key — pulling spill back away from the shadow side — looks dimensional, sculpted, cinematic.
This lesson is about negative fill, flagging, and the broader practice of shaping shadows.
What negative fill actually is
Negative fill (often shortened to "neg fill") is a dark surface — typically black duvetyne, black flag, or a black v-flat — placed opposite the key light, on the shadow side of the subject. It absorbs ambient bounce light that would otherwise spill into the shadows and reduce contrast.
The result: the shadow side of the subject gets darker. The contrast ratio between the key side and shadow side increases. The face looks more shaped, more dimensional.
Negative fill doesn't add light. It removes light. But the visual impact is often stronger than adding a fill light.
Why this works
Light sources are everywhere. Walls reflect. Ceilings reflect. The floor reflects. Even on a "controlled" set, ambient bounce is everywhere — and it's lifting the shadows on your subject in ways you don't see consciously but that flatten the image.
Negative fill stops this. By placing an absorbing surface between the subject and the bounce source (often a wall or a window), you reclaim the shadow.
It's the same physics as a flag — but instead of cutting direct spill, you're cutting indirect bounce.
When to use negative fill
The classic application: interview lighting where the subject looks flat.
You've set up a soft key light at 45 degrees off-camera, slightly above eye level. The face is lit, but the shadow side looks washed out — there's contrast, but not the dimensional contrast you wanted.
Add an 8×4 black flag (or a duvetyne-covered v-flat) on the shadow side, about 3 feet from the subject's face. The flag's job: absorb ambient light coming from the room's wall and ceiling.
Now the shadow side gets darker. The face has shape. The eye is drawn to the lit side. The image feels cinematic.
Other applications:
- Narrative dialogue scenes — neg fill on the actor's downstage side adds depth
- Product shots — neg fill on one side of a product creates separation from background
- Outdoor portraits — a black flag opposite the sun pulls shadow detail (the sun itself acts like the key)
What you need
The tool is simple but specific:
Black duvetyne — a heavy black fabric that absorbs light, doesn't reflect. Sold in 4×8 sheets or larger. Sometimes called "duvateen" or "black cloth."
Flags — wireframe panels with fabric stretched over them. Sizes from 12×18 inches up to 4×4 feet and beyond.
V-flat — two 4×8 foam-core boards taped together to form a V. Black side toward subject = neg fill. White side toward subject = positive fill (more bounce). Cheap (~$30 each), versatile, and used by every working DP.
Black foam core — for tight indoor work, a 4×4 sheet of black foam core is a quick neg fill.
For traveling crews: a couple of large black flags on c-stands give 90% of what a v-flat does and pack flatter.
Flagging — cutting direct light
Related but distinct from neg fill: flagging is placing an opaque object between a light source and a specific part of the scene to block direct spill.
Common uses:
- Cutting spill off the background — your key light is hitting the wall behind the subject and lifting it. Place a flag to block the spill from reaching the wall.
- Eyebrow flag — a small horizontal flag above the lens to prevent the key from creating a hotspot on the subject's forehead.
- Bottom flag — a flag below the lens to prevent spill from lighting the subject's chest or chair.
- Side flagging — a flag on one side of the light to keep it off the wall.
Flagging is precision work. You're not adding or absorbing — you're literally blocking direct light from hitting things it shouldn't.
Hard vs. soft shadows from negative fill
Negative fill doesn't change the hardness of the shadow itself — that comes from the size and distance of the key light. But neg fill does change the contrast ratio between the lit side and the shadow.
For a hard, dramatic look: bright key + close neg fill = high contrast, deep shadows. For a softer, natural look: bigger key + farther neg fill = moderate contrast, lifted shadows.
You're not just choosing "lit or unlit." You're choosing the ratio.
Practical example: interview with low budget
Imagine you have one light (a fresnel or LED panel), a roll of duvetyne, and a v-flat.
Setup:
- Light at 45 degrees from camera, slightly above eye level, diffused through a softbox or bedsheet
- V-flat on the shadow side, black side toward the subject, 3 feet from face
- Subject sits about 4 feet from a wall
- Optional: a flag between the key and the wall to prevent backlight spill
That's it. One light, two surfaces. The result looks dimensional, cinematic, professional.
Compare to "one light + no shaping": same key, but ambient bounce from white walls fills the shadows. Result is flat and amateur.
The difference is shaping.
Outdoors with sunlight
Direct sunlight is your hardest, brightest, free light source. It's also impossible to move. But you can shape it.
Mid-day sun (high angle):
- Sun is acting as a hard top light, casting raccoon-eye shadows
- Put the subject in shade (under a tree, an awning), then add a reflector to bring soft fill from one side
- Or, use a 6×6 silk overhead to soften the direct sun above the subject
Golden hour (low angle):
- Sun is acting as a backlight or rim
- Add fill from a reflector or bounce on the front to balance
- Use a flag on the camera side to prevent lens flare
In both cases, you're not adding light. You're shaping what's already there.
Common mistakes
- Lighting everything without flagging spill. A key light that hits the wall behind the subject lifts the background and flattens the depth.
- Symmetric two-light setups. A key on one side and a fill on the other matched in brightness looks flat. Use one light and shape it.
- Forgetting to look at the shadow side. Every time you set up a key, walk around and check what's happening on the other side. Often you'll see ambient lift that needs neg fill.
- Trying to "balance" too hard. A 1:1 lighting ratio looks like daytime TV. A 4:1 or 8:1 ratio looks like film.
- No neg fill in close quarters. Tight rooms with white walls produce maximum ambient bounce. Neg fill is essential.
What to practice this week
Set up a single light on a friend at 45 degrees. Take a photo or short clip.
Without changing the light, hold a piece of black foam core (or a black t-shirt over a flat surface) on the shadow side of the face. Take another shot.
Compare. The neg fill version will look noticeably more dimensional. The face will have actual shape.
Try it from different distances — closer = more contrast, farther = less. Find the ratio that fits the look you want.
Once you can do this with one light and one black flag, you understand lighting.
More lessons
Browse all
Audio
Audio fundamentals for video
Why bad audio kills good footage — and how to capture clean sound on a small crew
Audio
Multi-track audio workflow for narrative
Capturing lavs, boom, ambience, and timecode reference cleanly on a multi-input recorder
Business & freelance
Showcasing your work online
A reel that gets calls back, a portfolio site that works, and the basics of being findable
Found this useful?
Bookmark BOLD University and share it with someone learning the craft. New lessons go up regularly.
Back to University